Flight Manual: Saab 35 Draken 5.0Updated: 2020-11-01
System description
Cockpit overview
The virtual cockpit includes all instruments and nearly all controls from the real 35J. Some of them have a slightly different function than in the original due to limitations in Prepar3D.
The instruments in Draken use the metric system (altitude in meters, airspeed in km/h, distance in kilometers). Most gauges have tooltips that present the reading in both metric and Imperial units.

Fig. 36 - Virtual cockpit in Draken 5.0
The following sections of the Flight Manual explain the various systems and instruments in Draken. Reading through the systems descriptions before you start is highly recommended, but you can also skip this part and go directly to the Normal operating procedures chapter.
Warning and indicator lights
Warning lights panel

Fig. 37 - Warning lights panel overview
Notes
-
The HYDR II warning will light up momentarily if you are at ground idle and make large stick movements. This is normal and only indicates that hydraulic pressure is insufficient to deflect the elevons fully. The EPU will also be extended momentarily while the warning light is lit.
-
The TANKP warning light will be lit when AC power is off, unless fuel is provided from the drop tanks (drop tanks fuelled and valves open). In that case, fuel pressure will be sufficient even without the fuel pump.
-
The EBK warning light indicates that the exhaust nozzle
eyelids
are changing position. It will also be lit on afterburner malfunction. It does not indicate that the afterburner is active. See also Engine. -
The STYRAUT warning light indicates autopilot failure, not that the autopilot is active. It will also be lit if you switch off the autopilot main switch.
Master Warning Light
The Master Warning Light (red) will blink if any of the other warning lights are lit, with some exceptions:
-
The Engine Deice indicator light (MOTOR IS) will not trigger a Master Warning.
-
The EBK warning light will only trigger a Master Warning if it is caused by an afterburner malfunction.
-
When the emergency bus is switched on, the Electrical Failure (ELFEL) warning will still be lit, but the Master Warning will disappear.
-
The Fuel System (TANK LUFT) warning sometimes lights up for a few seconds when the system switches from external to main fuel tanks. This will not cause a Master Warning.

Fig. 38 - Master Warning light
Gear Warning Light
The Gear Warning Light (orange) blinks while the main gear is being extended or retracted. It will also blink if throttle is reduced at low altitude with the gear not extended. See also Landing gear.

Fig. 39 - Gear Warning light
Hydraulic system
The hydraulic system has three pumps feeding two circuits:
|
Circuit |
Pump |
Pressure |
Consumers |
|---|---|---|---|
|
I |
1 + 2 |
210 kp/cm2 (20 MPa) |
Gear, wheel brakes, nozzle, speed brakes, autopilot, control surface servos |
|
II |
3 |
210 kp/cm2 (20 MPa) |
Nose gear steering, control surface servos |
Each hydraulic circuit has a corresponding low pressure warning light:

|
Hydraulic pressure in circuit I less than 5 MPa |

|
Hydraulic pressure in circuit II less than 15 MPa |
When the engine is not running and the aircraft is motionless there is no hydraulic pressure. All control surfaces (including air brakes) are inoperable, and the elevons will be fully deflected downwards. When the engine spools up, the elevons will slowly rise to neutral position and all control surfaces become operable.
If the pressure in circuit II falls below 17.5 MPa, a backup hydraulic pump driven by a ram air turbine, the Emergency Power Unit (EPU), is automatically deployed. The backup pump will supply enough hydraulic pressure for the control surface servos (provided that the aircraft has enough airspeed). The EPU is automatically retracted when the pressure in circuit II exceeds 18.1 MPa.
At ground idle, large stick movements may cause the pressure in circuit II to momentarily fall below the threshold value, which will set off the HYDR II warning light and extend the EPU. This is normal and not a hydraulic system fault.
Wheel brakes
The wheel brakes are hydraulic self-adjusting anti-lock disk brakes. Normal brake pressure is 210 kp/cm2 (20 MPa). At least 60 kp/cm2 (5.9 MPa) is needed for effective braking. Brake pressure is provided by hydraulic pumps 1 and 2.
The hydraulic pressure in the brake circuit is shown by the brake pressure indicator on the right knee panel. It should always indicate normal pressure (210), with a very slight dip when brakes are applied. If the indicator shows zero pressure, the brake circuit is damaged.
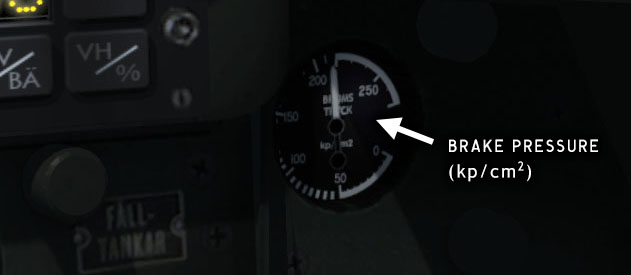
Fig. 40 - Brake pressure indicator
Extending gear at high airspeed may damage the wheel brake hydraulics. Do not extend the gear if airspeed exceeds 500 kmh.
In Prepar3D the anti-skid brake function is disabled by default. In this simulation it is always enabled.
Electrical system
Specifications
|
Electrical system specifications |
|
|---|---|
|
Alternator |
200 VAC/400 Hz/20 kVa |
|
Emergency alternator |
200 VAC/400 Hz/3.5 kVa |
|
Power consumption (typical) |
16 kVa |
|
Battery |
24 V/6.5 Ah |
| Bus name | Voltage | BATT | ALT |
EPU |
|---|---|---|---|---|
|
Hot Battery Bus |
24 VDC |
X |
|
|
|
DC Main Bus |
29 VDC |
X |
X |
X |
|
DC Normal Bus |
29 VDC |
|
X |
|
|
AC Main Bus |
3 x 200 VAC |
|
X |
X |
|
AC Normal Bus |
3 x 200 VAC |
|
X |
|
|
Instrument Bus |
3 x 45 VAC |
|
X |
|
The alternator is connected directly to the engine turbine shaft and has a regulator which keeps AC voltage and frequency constant regardless of engine speed.
Before the engine has been started, electrical power is normally supplied by an APU (Auxiliary Power Unit). Starting can also be done using only the aircraft battery as power source. In this version the APU is not implemented, and the battery is used for starting.
A backup alternator driven by a ram air turbine supplies power to the Main and Instrument buses in case of engine failure. See Emergency Power Unit (EPU).

Fig. 41 - Engine control panel – electrical bus switches
Electrical failures
DC bus failures are indicated by the ELFEL warning light on the warning lights panel. This warning light will also be lit when the backup alternator is connected.

Fig. 42 - DC bus failure warning light
AC bus failures are indicated by a mechanical indicator on the Airspeed/Mach Indicator. If the white field is visible it means that AC power is not available.
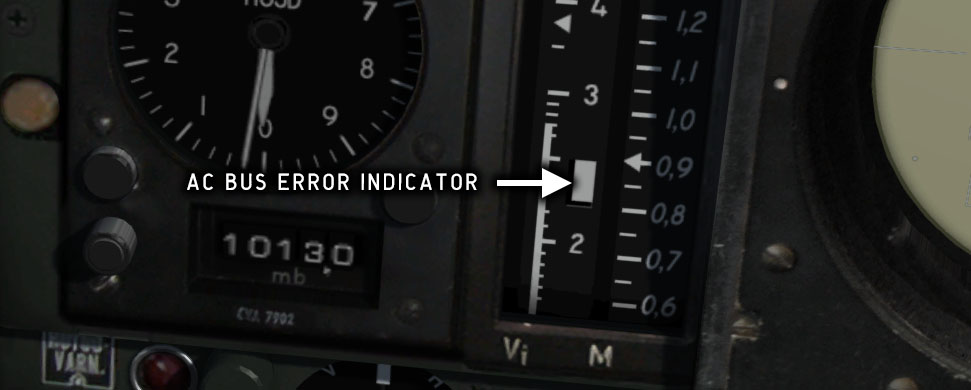
Fig. 43 - AC bus failure indicator
Electrical panels

Fig. 44 - Electrical system control panels
LANTERNOR
Navigation lights. Four-way switch, center position is OFF.
HEL = bright, HALV = dimmed, BLINK = blinking (seldom used).
IND LAMPOR
Dimmer for all warning and indicator lights.
HALVLJUS = dimmed, HELLJUS = normal.
IND LAMPOR PROV
Push to test all warning and indicator lights.
NÖDSTRÖM
Emergency electrical bus toggle.
See also Emergency Power Unit (EPU).
AVISNING MOTOR
Engine de-ice. Use only before take-off.
MOTOR IS warning light is lit when activated.
AVISNING HUV
Canopy de-ice. Three-way switch, center position is OFF.
KABINLUFT
Cockpit climate control panel. Not functional in this version.
Circuit breakers

Fig. 45 - Circuit breaker panel
All electrical circuit breakers should be ON (up) at startup, although only three of them have any function in this version. The first four circuit breakers should be switched off at shutdown, the other (covered) circuit breakers are normally always left on.
Interior lights

Fig. 46 - Interior lights panel
Instrument lighting and panel backlighting can be controlled individually with two dimmers on the left side of the cockpit. A toggle switch on the same panel controls the interior lights in the cockpit.
INNERLYSE
Interior lights
PANELLYSE
Panel backlighting
INSTRUMENTLYSE
Instrument lighting
Emergency Power Unit (EPU)

Fig. 47 - Emergency power unit
The Emergency Power Unit (EPU) is a ram-air turbine driving a backup alternator and a hydraulic pump. The alternator supplies 3.5 kVA and is connected to the electrical system bus when the EPU is deployed. The hydraulic pump has enough capacity to supply the most crucial functions.
When the hydraulic pressure drops below the threshold value and/or the AC bus is powerless, the EPU will be deployed and the electrical system will be connected to the emergency bus.
The emergency bus can be connected manually by toggling the NÖDSTRÖM switch. When this switch is on, the EPU will be deployed and the electrical system warning light ELFEL will be lit. This switch should be off under normal flight conditions.

Fig. 48 - Emergency bus switch
The EPU will only supply electrical and hydraulic power if airspeed is at least 100 kmh (54 kts).
Fuel system
The fuel system consists of a low pressure system which includes the fuel tanks, fuel pumps and distribution system, and two high pressure systems that include fuel injection pumps, regulators and nozzles for the engine and afterburner.
The low pressure fuel system is controlled with valve switches on the engine control panel, while the high pressure system is controlled by the throttle handle.
The purpose of the low pressure fuel pumps is to raise the fuel pressure to a suitable level for the engine injection pump. The low pressure fuel pumps are powered from the AC bus and will only work when this bus is powered by an APU or the EPU. A separate start pump which is powered from the DC battery bus is used when starting the engine on battery.
Fuel tanks
J 35J has two internal tank groups with a total capacity of approximately 2700 litres. Each tank group also has a small buffer tank to facilitate fuel flow in inverted flight. >Two external tanks with 525 litres each can be fitted under the fuselage.
The 35J model could optionally be fitted with two additional drop tanks on the
wet
outer wing pylons. These tanks were normally only used for ferrying
missions. Wing tanks are not implemented in Draken 5.0.
The external tanks are jettisoned with the Drop Tanks 1 command. See also Drop tanks.
In Prepar3D the main tank groups in Draken are represented by Center, the buffer tanks by Left Aux, and the drop tanks by External 1.

Fig. 49 - Prepar3D Fuel and Payload dialog
Fuel control
The Main Fuel Valve and Afterburner Fuel Valve switches on the Engine Panel control the low pressure fuel valves for engine and afterburner. Both switches must be ON during flight. The LT indicator light will be lit when either of these switches are OFF.
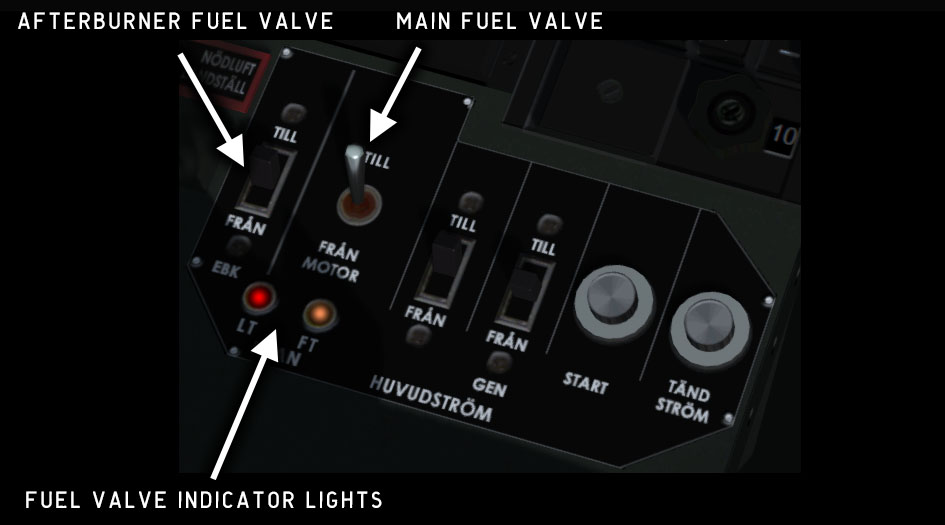
Fig. 50 - Engine panel
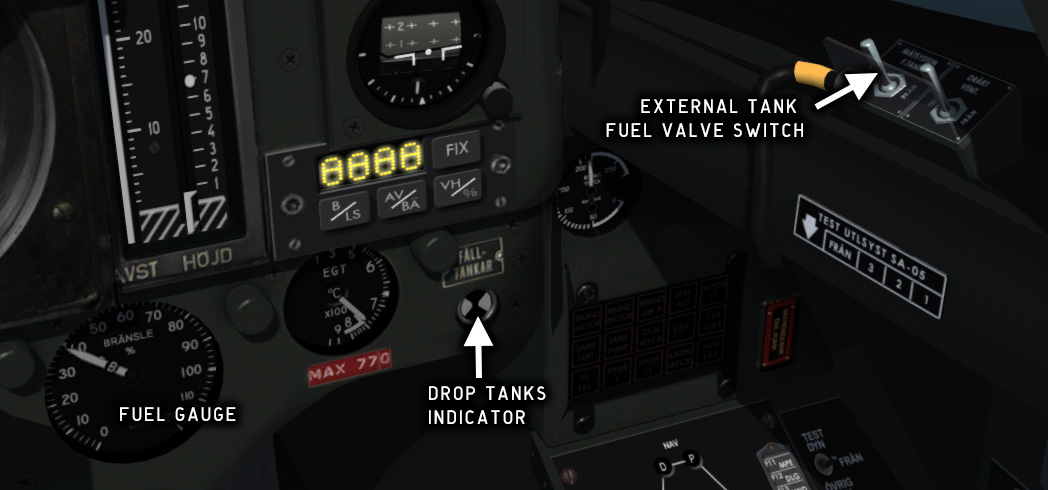
Fig. 51 - Front panel right side
The Drop Tanks Indicator shows two white fields when the drop tank fuel valve switch is ON and there is fuel in the external tanks.
The drop tank fuel valve switch (MÄTSYSTEM FTANK) controls the low pressure fuel valves for the external tanks.
When the drop tank fuel valve switch is OFF, fuel will be supplied from the main tanks, alternating between front and rear groups to maintain the center of gravity. The fuel gauge needles for the forward (F) and rear (B) groups should not differ more than 5%.
When the drop tank fuel valve switch is ON, fuel will be supplied from the external tanks. The fuel gauge indicates remaining fuel in the external tanks, with 40% as maximum (80% with wing tanks). When the external tanks are empty or the drop tank fuel valve switch is OFF, the drop tank fuel valves close and the main tank valves open. The fuel gauge will automatically switch to measuring the main tanks, and the white fields on the Drop Tanks Indicator will disappear.
Engine
The engine in J 35J is a Volvo Flygmotor RM6C, which is an upgraded license-built Rolls-Royce Avon 300 Mk. 60 turbojet with a Swedish single-stage EBK-67 afterburner.
The afterburner adds thrust to the engine by injecting additional fuel into the exhaust section. The ignited fuel raises the exhaust gas temperature, which increases the exhaust gas volume and speed. The exhaust nozzle area is widened when the afterburner is active to prevent the exhaust gas speed from exceeding Mach 1.
The engine control panel is located beside your left knee in the cockpit, just in front of the throttle lever. The panel is described in Before starting the engine and Starting the engine.
The alternator switch is spring-loaded. Push UP to switch the alternator ON. Push DOWN to switch it OFF.
The AC bus relay will only be actuated when engine speed is above 30 %. If engine speed falls below 27 %, the relay will drop and an AC bus error is indicated.
Engine control panel
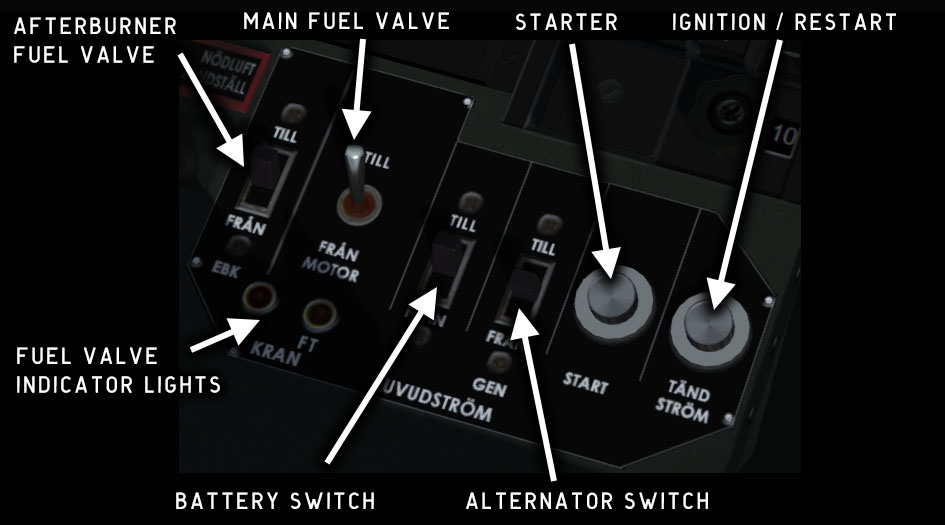
Fig. 52 - Engine control panel – overview
Exhaust temperature control

Exhaust gas temperature regulator (MAX TEMP/MTR)
The exhaust gas temperature regulator automatically reduces fuel flow to the engine if EGT exceeds 750° C to protect the engine from damage by overheating.
The regulator should normally be enabled (TILL), but can be disabled (FRÅN) to prevent loss of thrust during combat or under critical conditions.
The MTR system is not simulated in this version.
Exhaust nozzle regulator (RAT)
The exhaust nozzle regulator opens the exhaust nozzle eyelids fully to prevent overheating when the aircraft is on the ground and the throttle is at ground idle. The EBK warning light will be constantly lit in this mode. The nozzle will revert to the normal position once the throttle is above ground idle.
The RAT function should normally be enabled (TILL). It is automatically disabled when the aircraft is airborne.
The RAT function should not be confused with the ram air turbine, which is often abbreviated RAT but is here referred to as the EPU (Emergency Power Unit).
Landing gear
The landing gear consists of a main gear, a nose gear, and a spurwheel. The spurwheel protects the tail end as Draken has a very high attitude on landing. The landing gear is normally extended and retracted using hydraulic pressure from hydraulic circuit I, see Hydraulic system.
The main and nose gear are locked mechanically in both the extended and retracted positions. The spurwheel is hydraulically locked in the extended position and held in place by the spurwheel hatches when retracted.
A mechanical lock prevents the gear lever from being moved from the "gear extended" position if the throttle is at less than 90%.
The lights on the Gear Indicator are lit when the respective gear mechanisms are locked in the extended position.
The Gear Warning light (orange) blinks while the gear is being extended or retracted. It will also blink if the gear is not extended when airspeed is less than 450 kmh at less than 1450 m altitude and throttle is less than 85–90%.

Fig. 54 - Landing gear indicator and warning light
If hydraulic pressure in the gear circuit is lost, the gear can be extended using gravity and then locked using compressed air from an accumulator. The pneumatic lock is activated with a lever on the left side console. See also Hydraulic system failure.
Flight data system
The final version of Draken was a combination of old-school aircraft engineering and high-tech military avionics. The navigation, communication, flight control and weapons delivery systems in J 35J were closely integrated, interacting with ground mission control (STRIL) via data link.
The flight data system in J 35J consists of a data I/O unit, a Central Processing Unit (CPU), sensors, monitors, control panels and indicators for airspeed, altitude, navigation and targeting data. The CPU processes the signals from the sensors and monitors, radar and data link, and presents information on the various indicators and on the radar screen.
Airspeed/Mach indicator

Fig. 55 - Airspeed/Mach indicator unit
The Airspeed/Mach Indicator is controlled by the CPU, which reads the nose pitot tube pressure.
The Mach scale is linear between M 0.5–2.0, with an index at cruise Mach (M 0.9).
The Vi scale is linear from 150–350 kmh and logarithmic from 350–1400 kmh. The scale has indices for V2 (270 kmh), Vref (375 kmh), and VNE (1350 kmh).
A white rectangular field on the lower part of the airspeed scale indicates AC bus failure. The indication disappears when the engine speed exceeds 27 % and the alternator bus is switched on.
Distance/Altitude/Command indicator

Fig. 56 - Distance/Altitude/Command indicator unit
The left scale shows the distance to the currently selected navaid in ranges 0–40 km or 0–400 km depending on the setting on the PN-594 control panel, see PN-594/A navigation radar.
The right scale shows the standard pressure altitude in kilometers at 1013.25 hPa (QNE). The tape indicator indicates kilometers, the dot indicates hundreds of meters.
The window at the top shows STRIL mission control information (not implemented).
The small arrow indicates target altitude (not implemented).
Altimeter

Fig. 57 - Altimeter
The altimeter shows the pressure altitude in meters, calculated by the flight computer. The needles are driven by an electrical stepper motor, which means that needle movement is not fluid but in small increments and the reaction can be slightly delayed.
To set the altimeter, place the cursor on the pressure setting knob and rotate the mouse wheel. Pressure setting is in millibars (hPa).
FLI 35 system
The FLI 35 system is a spatial data processing/presentation system comprising the main gyro, the attitude and horizontal situation indicators, and a waypoint navigation system.
FLI 35 processes data from the gyro, sensors and monitors, and presents information to the pilot. The system automatically compensates for magnetic deviation and gyro drift.
Ten waypoints can be programmed by entering predefined waypoint codes on a numerical keypad. The flight computer will calculate course, distance and estimated fuel consumption to the currently selected waypoint and present it on a LED display.
FLI 35 Instruments
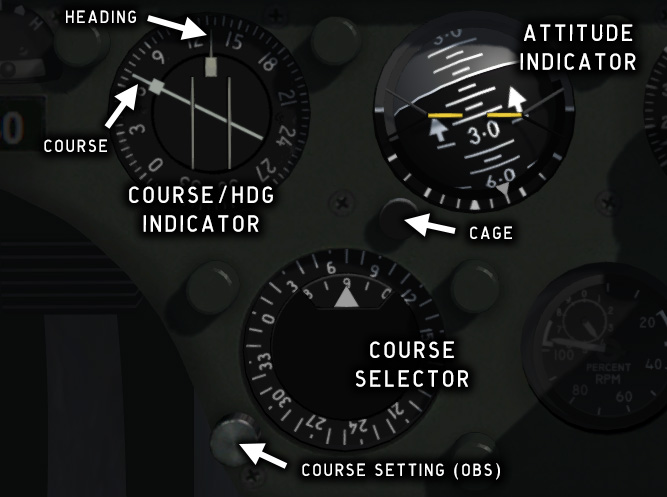
Fig. 58 - FLI 35 main instruments
Attitude indicator
The FLI 35 attitude indicator is electrical and is connected to the main gyro via the FLI 35 flight computer. In case of a malfunction in the FLI 35 system there is also a backup attitude indicator which is connected to a separate gyro. See .
Course/Heading indicator
The course/heading indicator is basically a HSI without VOR indication. The rotating scale shows the magnetic heading. The course indicator needle is either commanded by the flight computer or set manually with the course selector.
The course/heading indicator is powered by the AC bus. The scale and needle will freeze when AC power is off.
Course selector
The course selector is used to manually set the course needle on the course/heading indicator. It basically corresponds to the OBS setting in VOR navigation.
FLI 35 Control unit
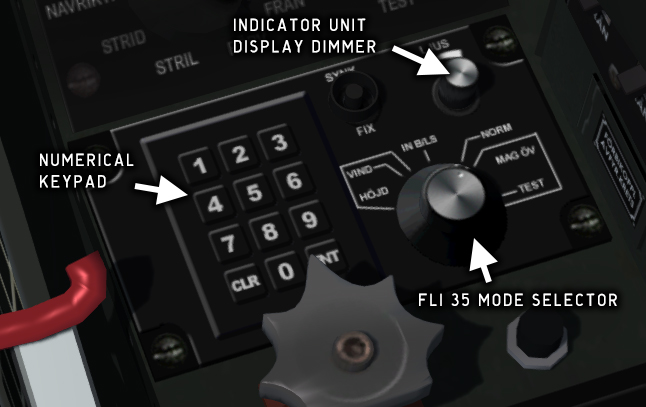
Fig. 59 - FLI 35 Control Unit
The Control Unit is used to select the FLI 35 operation mode and to program waypoints. The display on the Indicator Unit can be dimmed with the LJUS knob.
HÖJD
Not used in 35J - Indicator Unit will show FEL (error).
VIND
Used to enter predicted winds. Not functional in this simulation.
Indicator Unit will show ----.
IN B/LS
Programming mode - used when programming waypoints (see below).
NORM
Normal mode (default).
MAG ÖV
Backup mode - Indicator Unit is disabled.
The SYNK button and the FIX LED indicator are not functional in this simulation.
-
On the FLI 35 Control Unit, select IN B/LS to enter programming mode.
The Indicator Unit will now alternately display waypoint slot number and waypoint code.
-
On the Indicator Unit, press B/LS repeatedly to select the desired waypoint slot (1 to 10).
-
On the Control Unit, press CLR to clear the selected waypoint.
-
Use the keypad to enter a waypoint code (e.g. 9010 for Ängelholm F10 AB).
See Appendix 4: PN-594 Nav stations for a list of waypoint codes.
-
Press ENT to store this waypoint in the current slot.
-
Press B/LS to select the next slot and repeat steps 3–5 as needed.
-
When finished, set the Mode Selector to NORM.
Programming FLI 35 waypoints
You can now use the keys on the Indicator Unit to cycle between waypoints and display the distance, bearing and predicted fuel consumption for each leg.
FLI 35 Indicator unit
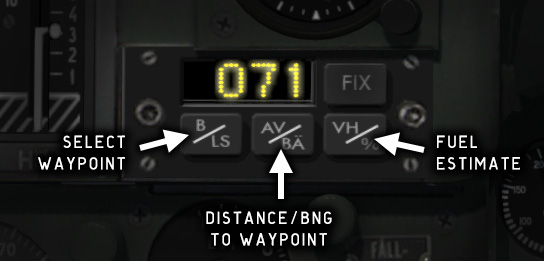
Fig. 60 - FLI 35 Indicator unit
B / LS
Press repeatedly to cycle through waypoints 1–10.
AV / BÄ
Calculated distance/bearing to the selected waypoint is shown alternatingly for 2 seconds. Course is always shown with three digits (000–359).
VH / %
Estimated fuel consumption to the waypoint as a percentage of total fuel capacity (external tanks included).
FIX
Updates the selected waypoint with the current position (not functional in this version).
PN-594/A navigation radar
J 35J was not standard-equipped with civilian VOR/ILS. Instead, it used query/response signalling between the aircraft and military ground stations for long-range navigation and landing guidance. The aircraft queried the ground station, and the response signals were processed by the on-board computer and used to control the Flight Director crossbars.
This system was called PN-594/A, and the navigation and landing systems were respectively nicknamed Anita and Barbro. Draken 5.0 includes a scenery with TACAN and ILS navaids that simulate the Anita and Barbro stations.

Fig. 61 - Barbro and Anita scenery objects
The Anita station basically works as a long-range DME. The maximum range is 400 km (216 NM), although the actual range depends on altitude and terrain.
The Barbro station is located slightly offset from the runway. The approach path deviates from the centerline by a few degrees and intersects it at a point 800 m out from the touch-down point. The glide path is 2.86°. The maximum range of the Barbro station is 30 km (16 NM).
To fly an approach, set the desired Barbro station on the LANDN dial of the PN-594 unit and select LANDN40, then keep the vertical crossbar centered. You will be guided in an optimal turn to a point intersecting the centerline. To capture the signal you need to be within a 72° sector of the approach and within range of the Barbro station.

Fig. 62 - Flying a LANDN 40 approach
PN-594 Control Panel
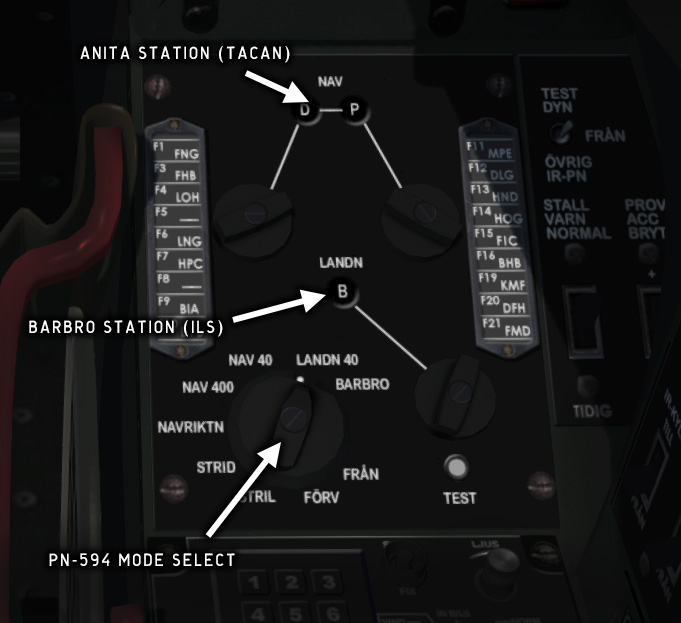
Fig. 63 - PN-594 control panel
The NAV dials are used in combination to select the two-letter ANITA station code.
The LANDN dial selects the BARBRO station.
See Appendix 4: PN-594 Nav stations for a list of ANITA/BARBRO codes.
| Mode | DME scale | Vertical FD bar | Horiz FD bar |
|---|---|---|---|
|
FRÅN |
Off |
Off |
Off |
|
FÖRV |
Off |
Off |
Off |
|
STRIL |
Off |
STRIL commanded course (here: FLI 35 waypoints) |
Off |
|
STRID |
Off |
Off |
Off |
|
NAVRIKTN |
Off |
ANITA/VOR |
Off |
|
NAV 400 |
400 km |
ANITA/VOR |
Off |
|
NAV 40 |
40 km |
ANITA/VOR |
Off |
|
LANDN 40 |
40 km |
BARBRO/LLZ intercept |
BARBRO/ILS glide slope |
|
BARBRO |
40 km |
BARBRO/LLZ deviation |
Off |
Test button
To test the crossbars, select NAVRIKTN and push the TEST button on the PN-594 control panel. The vertical crossbar should now move to the center.
Manual tuning unit
To use standard VOR/ILS navaids for navigation in Prepar3D, a Collins-style VHF tuning unit has been included. This unit is similar to VHF radio tuners that were used in earlier versions of the J 35 and in some export versions. It was not present in the real J 35J.

Fig. 64 - Navigation radio selector / manual tuning unit
Toggle the MHz/PN-59 switch to choose between VOR or PN-594 navigation.
The ID switch will enable audio when using VOR navigation
Flight director

Fig. 65 - Flight director crossbars
The horizontal bar is a glide slope indicator for Barbro stations in LANDN40 mode and for ILS in manual mode.
The vertical bar works like a standard LLZ indicator for Barbro stations in BARBRO mode and for VOR/ILS in manual mode. In LANDN40 mode it will guide you into an optimal turn until you are exactly on the localizer course.
The crossbar illumination brightness is controlled with the KORSVISARE dimmer on the weapons control panel.
In LANDN40 and BARBRO modes the distance indicator shows distance to the TDZ of the selected runway. In all other modes it shows distance to the DME transmitter.
Radios
Draken has two radio transceivers for voice and data communication: FR28 (UHF/VHF) and FR21 (VHF). FR28 is used for voice communication. FR21 is normally used for data but can also be used for voice as backup. FR28 also had independent monitoring on the emergency channel 121.50 MHz.
FR28 could operate on VHF 103.000–159.975 MHz and UHF 225.000–339.950 MHz with FM and AM modulation. FR21 only used the VHF range and AM modulation. In Draken 5.0 the whole frequency range from 103.000 to 339.950 MHz is supported on both radios.
FR28 basically corresponds to COM1 and FR21 to COM2 in this simulation. The radio control panels ME1, ME2 and ME3 are used in combination to control FR28/FR21 (COM1/COM2).
The radio panels on the left side console also include a VHF tuning unit for VOR navigation. This unit was not present in the real 35J.
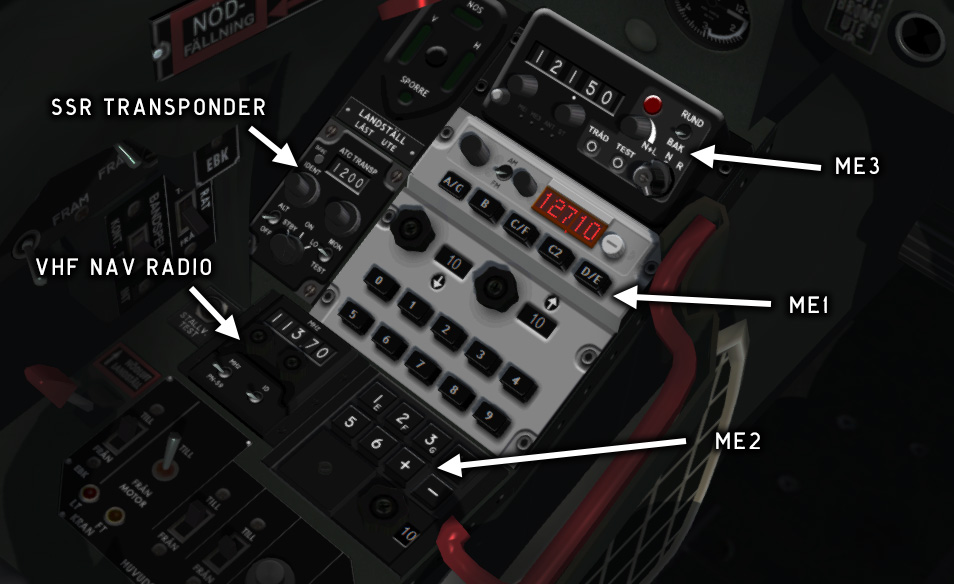
Fig. 66 - J 35J radio control panels
The radios are connected directly to the main electrical bus and have no master switch.
Radio control panel ME3

Fig. 67 - Radio control panel ME3
The ME3 panel is used to select communication radio modes and to set the frequency for FR21 (COM2).
N+L/N/R
Radio mode select, see table below
RUND/BAK
Antenna selector (not functional)
TEST
Press for 1 KHz test signal
TRÅD
Wired ground com (not functional)
|
Mode |
Real J 35J |
Prepar3D |
||
|---|---|---|---|---|
|
FR28 |
FR21 |
COM1 |
COM2 |
|
|
N+L |
Voice - ME1 121.50 MHz monitored |
Data - ME2 |
ATC set by ME1 |
121.50 MHz |
|
N |
Set by ME1 |
Disabled |
ATC set by ME1 |
Receiving only |
|
R |
Disabled |
Set by ME3 |
Receiving only |
ATC set by ME3 |
The error light indicates radio failure.
Radio control panel ME1

Fig. 68 - Radio control panel ME1
The ME1 panel controls FR28 (COM1).
The BASE selector and channel keys are used in combination to select one of 350 preset channels for TWR, TMC, etc. at 69 Swedish air bases. See Appendix 3: FR28 Radio channels for a list of airfields and channels.
The STRIL group selector and channel keys are used to select UHF channels.
When the minus key (–) is pressed, the com frequency is set manually with the two knobs to the left of the LED frequency display.
The FM/AM switch has no function in this version.
Accepting an ATC frequency change in Prepar3D will override the current preset or manual setting.
Radio control panel ME2

Fig. 69 - Radio control panel ME2
The ME2 control panel is used to select STRIL data channels for FR21. As STRIL is not implemented in this simulation, the ME2 panel has no actual function.
PN-837/A SSR transponder
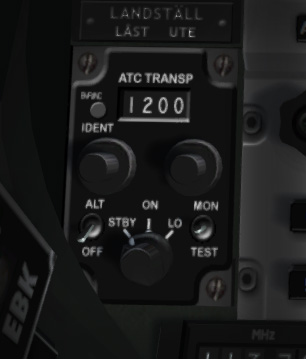
Fig. 70 - PN-837/A SSR transponder
The PN-837/A SSR transponder operates in the civilian modes 3/A and C.
ON
Normal mode (default)
STBY
Transponder on but not transmitting
LO
Transponder sensitivity reduced with -14dB
IND
Push to enhance signal from aircraft for identification
RPLY
Indicates query/reply transmission
MON/0/TEST
MON = RPLY indicator lit on query/reply
0 = RPLY indicator disabled
TEST = Test RPLY indicator (steady light)
ALT/OFF
Mode C altitude transmit on/off (not used)
PN-79 IK transponder

Fig. 71 - PN-79 transponder
The PN-79 transponder which is located on the right side console is a military IFF unit operating in encrypted mode.
As IFF is not implemented in this simulation the panel has no function.
Autopilot

Fig. 72 - Autopilot control panel
The SA-05 autopilot has only three modes: Altitude Hold (HÖJD), Attitude Hold (ATTITYD), and Pitch Damping (DÄMPN).
Unlike the standard
Prepar3D autopilot, the SA-05 autopilot is engaged
automatically when you load the aircraft, although none of its hold modes are
active. In
the real Draken the master switch was actually sealed in the ON position (TILL) and only switched off (FRÅN)
in an emergency.
The reason for this is that the autopilot in Draken handles the pitch damping function, making the aircraft less susceptible to PIO (pilot induced oscillation) that plagued the early versions of Draken. The damping mode was supposed to be switched on at all times. In this simulation pitch damping is actually a part of the FDE and can not be disabled.
The altitude and attitude hold modes will disconnect automatically under certain flight conditions, see Autopilot override conditions.
Altitude hold mode (HÖJD)
In this mode the aircraft will lock to the current altitude. If the bank angle is less than 15 degrees when this mode is activated, the wings will also be leveled. The HÖJDV indicator light (altitude hold) will flash until altitude is stable, then it will show a steady light.
The SVÄNG (turn setting) knob on the autopilot control panel will bank the aircraft left/right in 15 degree increments.
In the transsonic speed range (M 0.95–1.05) the autopilot will change temporarily to attitude hold mode, and the HÖJDV warning light will flash. When the aircraft exits the transsonic speed range, the autopilot will change back to altitude hold mode. The mode indicator on the autopilot panel will not change.

Fig. 73 - Altitude hold light
Attitude hold mode (ATTITYD)
In this mode the aircraft will hold the current pitch attitude. If the bank angle is less than 15 degrees when this mode is activated, the wings will also be leveled. The Pitch Adjust lever will adjust pitch up/down in 1 degree increments.
The SVÄNG (turn setting) knob on the autopilot control panel will bank the aircraft left/right in 15 degree increments.
Damping mode (DÄMPN)
Pitch and yaw damping. This is the default mode which should always be on in manual flight to prevent PIO (Pilot Induced Oscillation).
Trim knobs
The Roll Trim and Yaw Trim knobs will adjust roll and yaw trim in 10 % steps. Trim setting will affect the control surfaces regardless of the autopilot status, and is added to the current roll/yaw attitude in altitude/attitude hold modes.
Autopilot override conditions
In altitude and attitude hold modes the autopilot will disconnect automatically if the joystick is moved abruptly, if one of the attitude indicators is caged, or if G force is above 4 G or below -0.5 G. The autopilot warning light STYRAUT and the master warning light will then light up. There is no acoustic warning.
To reconnect the autopilot and reset the warning lights, press one of the mode select buttons on the autopilot control panel.
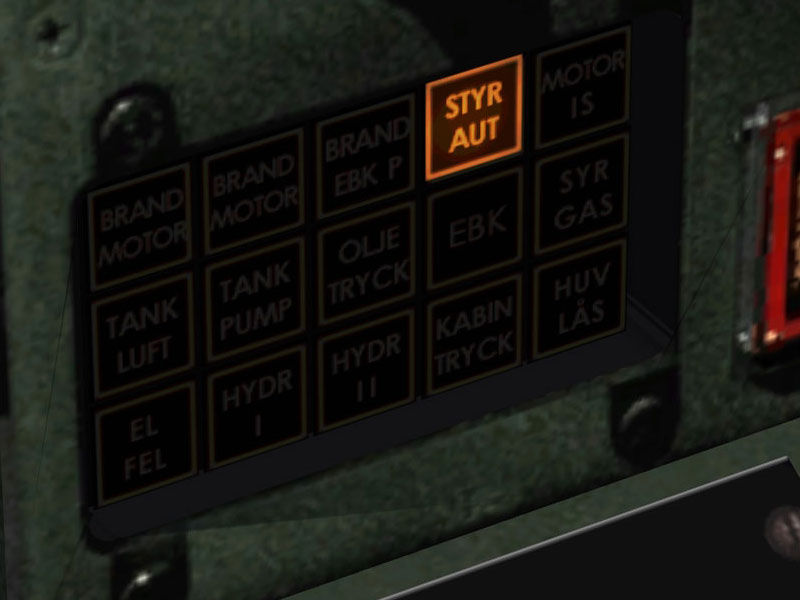
Fig. 74 - Autopilot warning light
The G force override function can be tested with the PROV ACC BRYT switch located on the far right knee panel. Pressing the switch upwards (+) simulates a high positive G condition, and vice versa.

Fig. 75 - Autopilot override test switch
Other instruments
AOA indicator

Fig. 77 - AOA indicator
The AOA indicator shows the current alpha angle of attack, which is the angle between the wing chord line and the current movement vector. Drag increases quickly with increasing alpha angle, so this indicator is crucial for maintaining control of the aircraft.
The Stall warning system will alert the pilot if the angle of attack exceeds a limit value.
Superstall (total loss of lift) will occur at AOA >18.
G-force indicator

Fig. 78 - G-force indicator
The G-force indicator, or G-meter, shows acceleration force in the range -1.5 to +11.5 G. The indicator has a maximum needle which is reset by pushing the reset button on the right side of the meter.
An acoustic warning signal is triggered at approximately +6 G.
The G-force indicator is disconnected when the aircraft is on the ground.
Chronometer
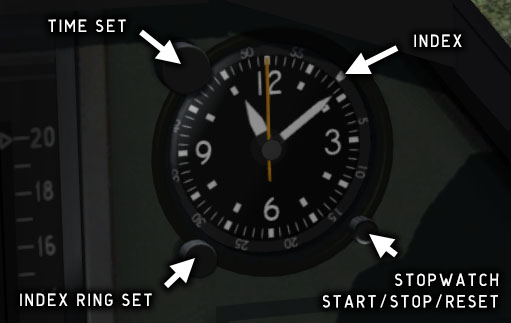
Fig. 79 - Chronometer
The aircraft chronometer is electrical and shows the current local time in hours/minutes. It has a stopwatch function and a moving index used to monitor flight time.
Before take-off, turn the index ring to align the index with the minute hand. The duration of the flight can then be read from the position of the minute hand vs. the index.
The stopwatch pushbutton will successively start, stop, and reset the stopwatch.
Backup attitude indicator

Fig. 80 - Backup attitude indicator
The backup attitude indicator is connected to a separate gyro and provides attitude information in case of a malfunction of the FLI 35 system.
Backup altimeter

Fig. 81 - Backup altimeter
The backup altimeter is located on the left knee panel. The indicator is mechanical and directly fed from an aneroid. It is completely separate from the main altimeter and has its own pressure setting.
Backup airspeed indicator

Fig. 82 - Backup airspeed indicator
The backup ASI is located on the left knee panel. It shows indicated airspeed from 150–1200 kmh. The backup ASI is completely mechanical and is connected to the stab fin pitot tube, while the main ASI via the flight computer is connected to the nose pitot.
Cabin pressure indicator

Fig. 83 - Cabin pressure indicator
The cabin pressure indicator is located on the left knee panel. It shows the pressure difference between ambient pressure and cabin pressure.
Cabin air pressure is regulated by a pressure regulator. The pressure difference should be zero up to 3000 m altitude, and then increase with altitude to a maximum of ~0.25 kp/cm2 (24.5 kPa) at 6400 m.

If the pressure difference exceeds 26 kPa, the KABINTRYCK warning light will be lit.
Stall warning system

Fig. 85 - Stall Warning System
The Stall Warning System will warn the pilot when the angle of attack of the wing is approaching a critical value.
The system has two modes that can be selected from a panel on the right side console. In NORMAL mode, the stall warning alert will sound at AOA = 15.5, and in EARLY mode at AOA = 14.
Stall warning test

The STALLV. TEST button on the left side console can be used to test the stall warning system. Pressing this button will force the angle of attack indicator to just below the stall warning value. Applying back pressure at this point should trigger a stall warning.
Oxygen system

Fig. 87 - Oxygen control panel
The oxygen system supplies a mixture of oxygen and air to the pilot's breath mask. The mixture is automatically regulated depending on the cockpit air pressure. At an air pressure corresponding to 9000 meters altitude the system will supply pure oxygen.
The oxygen pressure indicator on the right side console indicates the pressure in the oxygen tanks, which should be at least 80 kp/cm2.
The oxygen shut-off valve is located to the left of the oxygen pressure indicator. If the oxygen valve is closed, or if the oxygen tank is empty, the SYRGAS warning light will be lit.

Fig. 88 - Oxygen warning light
Radar system
The radar in J 35J was an Ericsson PS-011/A radar, which was a major upgrade of the older Ericsson PS-01/A system used in J 35F.
The radar
functions in this simulation are not even close to the real
radar system, although the range and scan modes are roughly similar. The radar
screen will
display AI and multiplayer aircraft, but no ground or sea objects. Targeting
functions and
weapons delivery are not implemented.
The radar will only transmit when the aircraft is off the ground. When the nose gear is compressed, the radar will automatically be switched to silent (non-transmitting) mode.
Radar screen
The radar screen presentation mode is either B-scope or Tactical Mode
(F-scope). Mode switching was automatic during a mission depending on the situation
and
data from mission control (STRIL). In this simulation you toggle manually between
F-scope and B-scope modes with the KONTR switch on the
radar control panel (this switch was in reality only for testing purposes).
The radar has two distance ranges, 16 km and 40 km, and two sweep widths, 40 and 120. Antenna elevation can be adjusted, although it has no function in this simulation.
An artificial horizon is displayed on the screen when the radar is active or in standby mode. The gain (brightness) of the CRT screen and the illumination of the etched grid can be adjusted with dimmers on the Weapons control panel.

Fig. 89 - Radar screen
Radar control panel
The radar control panel is located on the left side wall of the cockpit. Only two of the switches are functional in this simulation.

Fig. 90 - Radar control panel
The B-scope/F-scope toggle switch was in reality a test mode switch, but in this simulation we use it to manually select presentation mode.
Weapons control panel
The weapons control panel on the right side wall of the cockpit contains the radar master switch and dimmers for CRT gain (brightness) and for the grid and crossbars in the radarscope. The FPLF switch selects whether the antenna should be gyro-stabilized (always horizontal) or fixed (moving with the aircraft).

Fig. 91 - Weapons control panel
Radar control handle
The radar control handle is a joystick
located on the left side in
the cockpit. The control handle was used to control the cursor on the radar
screen and
to quick-select targeting modes and weapons. It has no function in this
simulation.
The radar range select switch on the base of the radar control handle is used to select radar range.

Armament
Loadout configuration
The weapons shown in the exterior model can be changed using the Loadout Configuration panel.
Earlier versions of Draken (J 35A/B/D) had two 30 mm Aden cannons, but to make space for more avionics the left cannon was removed in models F/J. The 35J had a total of 6 hardpoints for Sidewinders, IR/RR Falcons and air-to-air rockets. Air-to-ground rockets and free-fall bombs could also be fitted, although AFAIK they were never used with 35J.
In this simulation there are 9 preset loadout configurations available, named J1 to J9. You can choose between three different Sidewinder models for each of the preset configurations.

Fig. 93 - Loadout configuration panel
|
Preset |
Description |
|---|---|
|
- |
Clean aircraft (no loadout) |
|
J1 |
2 Rb 27 (Radar-homing Falcon), 2 Sidewinders |
|
J2 |
1 Rb 27, 1 Rb 28 (IR-homing Falcon), 2 Sidewinders |
|
J3 |
2 Rb 28, 2 Sidewinders |
|
J4 |
1 Rb 28, 3 Sidewinders |
|
J5 |
1 Rb 27, 3 Sidewinders |
|
J6 |
Wing tanks, 2 Sidewinders (separate model) |
|
J7 |
6+6 13.5cm A-G rockets, 2 Sidewinders |
|
J8 |
2+2 13.5 cm A-G rockets, 2 Sidewinders |
|
J9 |
19+19 7.5 cm A-A rockets (pods), 2 Sidewinders |
|
Rb 24 |
AIM-9B Sidewinder |
|
Rb 24J |
AIM-9J Sidewinder |
|
Rb 74 |
AIM-9Li (Swedish modified AIM-9L) |
Selecting weapons
Selection and configuration of ordnance is carried out using the Weapons Control Panel.
Although weapons can be mounted and selected in this simulation, they are not functional and cannot be deployed.
The Weapons Indicator to the left of the gunsight shows which weapon is currently selected. Indicator lights R and I will be disabled if RR or IR targeting missiles are not mounted.

Fig. 94 - Weapons selection and indication
|
Selector |
Indicator |
Description |
|---|---|---|
|
FRÅN |
- |
Fire control system off |
|
RB 24 |
L |
Sidewinders on belly hardpoints |
|
AKAN |
A |
Automatic cannon |
|
FÖLJN |
- |
Radar targeting only |
|
RR |
R |
Falcons, radar targeting |
|
IR |
I |
Falcons, infra-red targeting |
|
RAK + RB 24 |
V |
Rocket pods/Sidewinders on wing hardpoints |
Gunsight
The S-7B3/31 reflector gunsight in J 35J was integrated with the avionics and radar systems, and could be used in either radar-aided or optical mode. It provided aiming information for A/A missiles in radar-aided mode, and for the cannon and A/G missiles in optical mode.
This simulation only includes the optical mode with gyro aiming (diamonds and pipper). The gunsight will be activated if the weapons selector is set to either AKAN (cannon) or any of the missile launch modes, see Selecting weapons.
The targeting range (radius of the gunsight reticle) can be adjusted with the knob on the right side of the gunsight assembly.

Fig. 95 - Gunsight in J 35J
Please note that targeting is not implemented in this simulation, the gunsight functions are just for fun.
Copyright © 2001–2020 Bookmark AB